Employee Portal
In this document you will find instructions for the Employee Portal. It is intended to help employees use the ShiftPlan solution.
The Employee Portal is for employees to access their individual plan and other information.
For mangers / planners, there is an User Portal, where employees, designated by the system administrator, can actively participate in the shift planning and workforce management. Instructions for User Portal
The Registration Terminal is used to register working time, but employees can also access their individual plan and other data. Instructions for using the Registration Terminal
Introduction
The Employee Portal is part of the ShiftPlan app intended for all employees of the organization. Through the portal, employees can access their individual work plan, hourly balance, attendance, annual leave quotas, requests and the work plan of their colleagues.
You can access the Employee Portal using a web browser or the mobile app.
The instructions provide an introduction to basic features of the Employee Portal, working with your account for employees (e.g. activating your account, login, changing your password), and then go into more detail about the individual content areas.
Overview is a basic view of the data for an employee. It provides quick access to up-to-date information relevant to the employee.
Requests allow you to communicate and confirm relevant information needed by the plan administrator to organise the workflow - e.g. desired dates of holidays, days off, approval of various allowances.
Swaps allow the exchange of shifts between employees. Here you can propose to swap shifts with an employee, or accept a swap proposed by a colleague or plan administrator. The accepted swap is automatically applied in the plan or is forwarded to the plan administrator for approval.
Plan shows all the information about the employee’s work plan. Team plan can also be displayed, which is however only available if an employee has corresponding permissions.
Reports contain all published summary or daily reports containing the employee’s data.
Notifications contains notifications and announcements relevant to employee, e.g. a newly published plan, changes to the plan, etc.
Some features might not be available for your organization, while others are subject to access rights of individual employees.
Installation
Employee Portal can be accessed in several ways, including:
These access methods are described in more detail below, together with their advantages and disadvantages. All ways of accessing the Employee Portal provide a full range of functionality and a comparable user experience
However, specific functionalities (mainly related to geolocation capture and specific ways of registering working time) are only available within the mobile app.
If you need to install a mobile app to use a particular feature, you will be prompted to install it when you use the portal.
Web app
If you use the portal as a web application, no installation is necessary. Simply enter the web address of the solution you received during account activation in the address bar of your browser and log in with your username. To access the portal, all you need is an internet connection and a modern browser.
If you access the web app on your mobile phone, the portal will automatically adjust to the size of your mobile screen.
Pros and cons of the Web App
+ No installation required
- The address bar and other browser UI elements take up screen space
- The portal is not accessible via an icon on your phone’s desktop
Progressive Web App (PWA)
Progressive Web App (PWA) combine the benefits of web apps with the user experience of mobile apps. You can install the PWA from within your web browser while using the web app, using the appropriate action in the browser. Once installed, you will be able to access the application using an icon on your mobile phone desktop, with the full screen of your phone available to display the portal (without the browser address bar).
The installation process varies slightly depending on the type of device (Android, iOS) and browser version. Below is the installation process for the most common cases. In some cases, your browser will prompt you to install the app while you are using the portal.
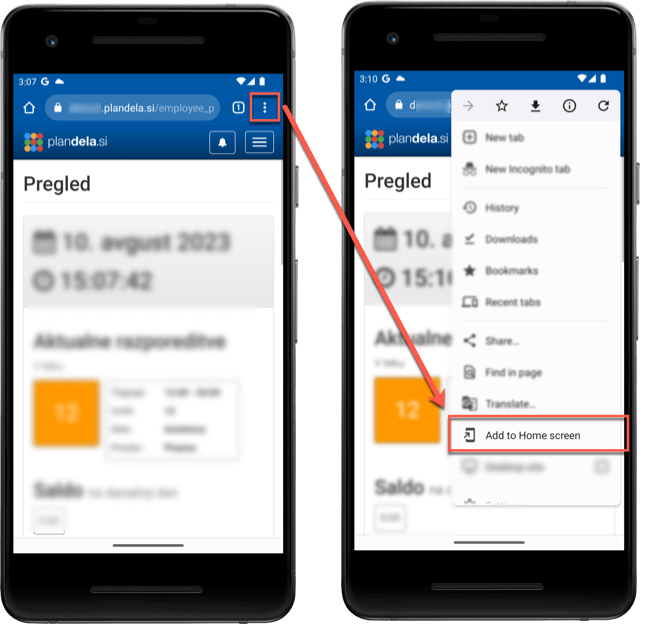
Android - Chrome
In the browser on your device, log in to the web app (see instructions above). Once you have successfully logged in, in the browser, select Add to Homescreen, Install app or a similar term (the actual name depends on your device and browser version).
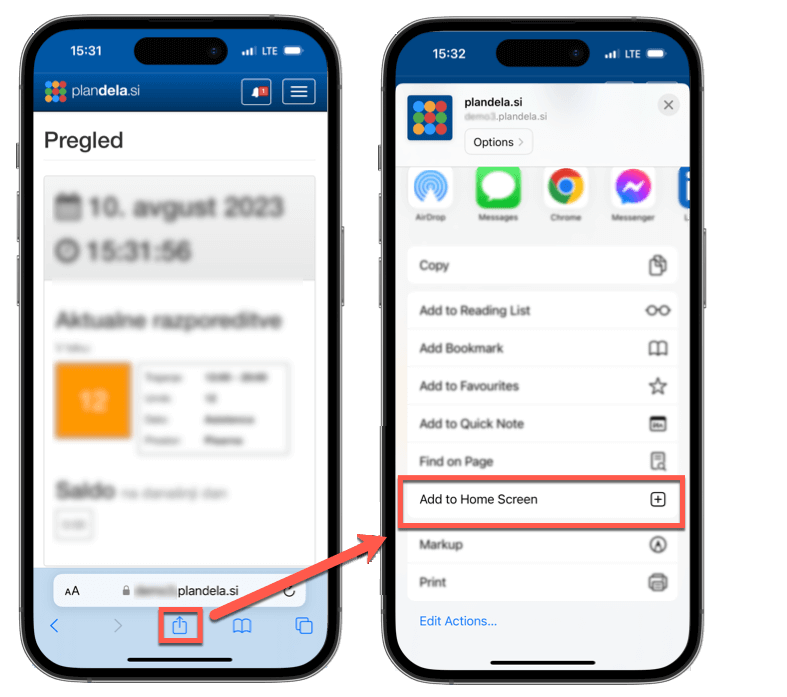
iOS (iPhone, iPad) - Safari
In the browser on your device, log in to the web app (see instructions above). Once you have successfully logged in, select Share, Add to Home Screen or similar in the browser (the actual name depends on your device and browser version).
iOS (iPhone, iPad) - Chrome
In the current version of Chrome on iPhone/iPad, you cannot install the Progressive Web App (PWA) on iPhone/iPad. Installation is only possible with the Safari web browser.
Other devices
The installation is also available on PCs and other devices. More information…
Pros and cons of a Progressive Web Application (PWA)
+ Easy installation and automatic upgrade
+ Desktop icon for easy access
+ Available without internet connection
- Some working time registration options are not available
Mobile app
You can also install the Employee Portal as a mobile app for free from the relevant app store:
After installing and launching the application, enter the web address of the solution you received during account activation in the login window and log in with your username.
Pros and cons of the Mobile App
+ All working time registration options available
+ Desktop icon for easy access
+ Available without internet connection
- Application installation required
Basics
The Employee Portal is navigable via the main menu, which is colored dark blue at the top of the page.
By clicking its tabs, you can access all the sections of the Employee Portal, from left to right:
On mobile devices with narrower screens, the main menu links are folded into the menu button on the right:
User account
Your user account provides you access to your data in the Employee Portal of ShiftPlan. To activate your account, contact the ShiftPlan administrator in your organisation.
Logging in and logging out of the Employee Portal is straight forward. You can also change your password or reset your password if you have forgotten it.
In case ShiftPlan is integrated with the user directory in your organisation, you do not have the possibility to manage your user account within ShiftPlan; use the prescribed account management procedures for your organisation.
Activation
To activate your account in the Employee Portal, contact the ShiftPlan administrator in your organisation.
You will receive an activation email containing the web address of the ShiftPlan app for your organisation, your username and a link to activate your account.
To activate your account, follow the Activate link.
If your organisation has integrated ShiftPlan with the user directory, activation will take you to the login page with an explanation that you can log in to the Employee Portal with your username and password from your organisation’s user directory; no further activation steps are required.
Enter your new account password in the provided fields and confirm by clicking Activate.
You can always lookup your username in the activation email. You however must remember password you just entered for successive logins.
When entering your password, upper and lower case letters are important!
Login
In the address bar of your browser, enter the web address of the ShiftPlan app for your organisation that you received with your activation email or start the mobile app that you installed on your device.
Enter the username and password in the login form. You received your username in your activation email.
When entering your password, upper and lower case letters are important!
In case ShiftPlan is integrated with the user directory in your organisation, follow the instructions given on the portal login page.
Change password
In case ShiftPlan is integrated with the user directory in your organisation, you do not have the possibility to manage your user account within ShiftPlan; use the prescribed account management procedures for your organisation.
You can change your password by selecting the My Account link in the User Menu. This link is only visible if you are logged in to the Employee Portal.
Enter your existing password and new password in the provided fields and confirm by clicking Change password.
When entering your password, upper and lower case letters are important!
Reset password
In case ShiftPlan is integrated with the user directory in your organisation, you do not have the possibility to manage your user account within ShiftPlan; use the prescribed account management procedures for your organisation.
If you have forgotten the password of your Employee Portal account, you can select the Password forgotten link on the login page. Enter your email in the provided field and you will receive an email to reset your password.
You will receive a password reset email containing the web address of the ShiftPlan app for your organisation, your username and a link to reset your account password.
To reset your password, select the Reset link. Enter your new password in the provided fields and confirm the password change by clicking Reset.
You can find your username in the password reset email. You must remember password you just entered for successive logins.
When entering your password, upper and lower case letters are important!
Logout
Log out of the Employee Portal of the ShiftPlan app by selecting the Logout link in the User Menu.
Overview
You may not see certain displays or data if they are not used or enabled by your organisation.
Overview is the default view in the Employee Portal and shows your workday, your work plan for the next few days, swaps and requests. It also allows you to record your attendance.
Your Day is displaying work assignments for current day, attendance data, hourly balance, annual leave availability and other counters. You might also have an option to clock in on designated devices or networks.
Plan shows your shifts in coming days. As in Plan, accessed by clicking More, you can obtain the details for each individual workday.
Requests shows your active requests. As in Requests, accessed by clicking More, you can view individual request or create a new request.
Swaps shows your relevant swaps. As in Swaps, accessed by clicking More, you can view individual swaps or propose a new swap.
Reports shows your current reports. As in Reports, which you can access by selecting More, you can view individual reports.
Attendance registration
You can also clock in via the Employee Portal on designated devices or designated locations; you can find out which devices or locations by contacting the ShiftPlan administrator in your organisation.
In Overview, in the Your day section, you will see the Attendance registration section at the top, which contains your current location, presence status and a clock-in selector.
To clock in or clock out according to the timetable, select Clock in or clock out. The registration will be automatically detected as arrival or departure according to the shift plan. If the recorded event does not match the shift plan, the shift plan administrator will be automatically notified of dicrepance.
Once the event has been recorded, a confirmation is displayed, which allows you to Undo registration for some time after the event has been recorded, in case of a mistake (e.g. wrong event selected).
After the cancellation period has expired, you can amend the registration by using the Amend presence request.
Undo registration
You can cancel an incorrect registration by pressing the button . The button is available for a few seconds after registration.
Amend registrations
If amending registrations is not enabled in your organisation, the page is not displayed
If you have forgotten to record your attendance or if there are errors in recording events or attendance, you can report this to the shift plan administrator using the Amend registration request.
Create a new request by clicking the *New request link either in the Requests section of Overview or on the Requests page.
Select the request type Amend registration, select the day on which the error occurred. A list of existing registrations for that day will be displayed. You can remove registrations by clicking or add them by entering the time and type of event.
Selecting Submit request will create a new request. The changes made will be visible in the overview and the timetable once they have been approved by the shift plan administrator. You will be notified by notification or email. The same applies if the request is rejected.
For more information on request, see Requests.
Requests
If requests are not enabled in your organisation, the page is not displayed
By posting a request, you communicate to the plan manager the information he/she needs to prepare the work plan - e.g. desired dates for holidays, days off, approval of various leaves, etc.
The Requests page shows your current requests by the request type, the period to which the request applies and the status of the request (possible request statuses are processing, cancelled, rejected, approved).
You can create by clicking the link New request.
By clicking a request, you can view its details, send a message to the plan manager, or cancel.
New request
Create a new request by clicking the *New request link either in the Requests section of Overview or on the Requests page.
Select the type of request you want to make. Depending on the type selected, enter the details of the request in the relevant fields (e.g. date period for annual leave, note to be sent to the shift plan administrator, etc.).
By clicking Submit request you will create a new request with the information provided.
The request has a status in progress when it is created, in which it remains until the plan manager approves or rejects it, or you [cancel] it (cancel_request).
While request is being processed, you can exchange messages with the plan manager related to the request.
Messages
During the request decision-making process, you can exchange request-related messages with the plan manager.
In the request view, write a note to a plan manager in relation to the request. By clicking Comment the note will be saved and the plan manager will automatically receive a notification.
Cancel request
You can cancel your request if it is still being processed.
You can also add a comment, which will be displayed to plan manager. By clicking Cancel request the status of the request to Canceled.
Swaps
If swaps are not enabled in your organisation, the page is not displayed
Using swaps, you can suggest a shift swap to a colleague, or you can accept a shift swap suggested by a colleague or the plan manager. Agreed swaps are either automatically applied to the plan, or are relayed the the plan manager for further approval.
Swaps view display the swaps (proposed by others and by you). You can filter entries according to their actuality and status (in progress, active, all).
The possible swap states are:
- proposed - the employee or plan manager has proposed the swap,
- agreed - all participating employees have agreed to the swap, approval by the plan manager still needed,
- rejected - some employees rejected the proposed swap,
- approved - the swap was approved and applied to the plan,
- rejected - the plan manager has rejected the swap.
You can propose a swap by clicking the Propose swap link.
By selecting a particular swap, you can view its details, post a comment, accept it or cancel it.
Suggest swap
You can propose a swap by clicking the Propose swap link in the Swaps section of Overview or in the Swaps section.
Select the shifts you want to swap with colleagues in the displayed plan. When selecting your own shifts, the hatch on the colleagues cells you can swap with without breaking the scheduling rules is cleared. This allows you to quickly find an appropriate swap. However you can also select hatched cells. You will be informed of resulting scheduling rule violations due to the proposed swap.
Option in the toolbar will only show employees in the plan that you can swap your currently selected shifts with without violating the scheduling rules.
You can filter the rows displayed by entering a team or employee in the field .
Confirm the selection of shifts using the Confirm changes button, and then add a note to the swap participants and plan managers if necessary.
Confirm the swap by clicking Propose swap. Colleagues are automatically notified of the proposed swap and either accept or reject it. Possibly, the swap must be subsequently approved by the plan manager, depending on the settings and potential scheduling violations due to the proposed swap.
While the swap is being processed, you can exchange swap-related messages with participating employees and plan managers comment_swap.
Messages
When swap is being processed, you can exchange swap-related messages with the participants and the plan manager.
In the shift view, click Comment to save the note. Participating employees and the plan manager will receive a notification.
Cancel swap
You can cancel the swap if it has not been applied yet.
You can also write a note to the participants of the swap and the plan manager. Clicking Cancel swap will change the status of the swap to Canceled.
Plan
In plan you can view your shift plan. For each day, you can access information about the schedule, the work and the place for each shift, presence, any notes, balance, remaining annual leave, other counters, etc.
The currently published work plan is shown. You are notified of a new plan and plan changes via notifications.
You can access the plan by clicking the Plan link in the Main Menu or More in the Plan section of Overview.
You can browse the plan by scrolling vertically. Use the date picker to jump to any date.
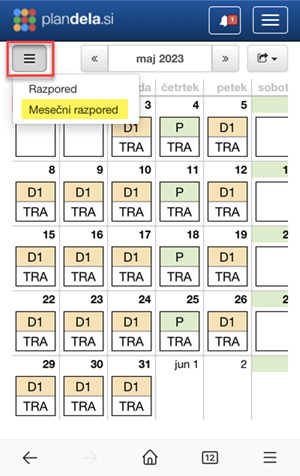
Monthly plan
There is also a summary view of the shift plan for the whole month. You can get it by clicking on and selecting Monthly plan.
Presences
The plan also displays the attendance for each day.
Presence status is indicated by the following colors:
- <span style=“color: #5cb85c”>green — full presence in line with your arrival and departure restrictions
- turquoise — indicates presence that has been confirmed or corrected by the administrator (e.g. missing time registration added)
- orange — indicates presence that deviates from your arrival and departure limits (e.g. late or excessively long working hours)
- <span style=“color: #d9534f”>red — presence containing an error (e.g. missing registration or arrival when there is no assignment)
A description or type of attendance error is also included with the status.
Export to calendar
Export of the plan to the employee’s personal calendar can be done manually with
the .ics file or automatically synchronised via a VCal feed. The appropriate
setup depends on the application you use for your calendar (Google Calendar,
Outlook, …).
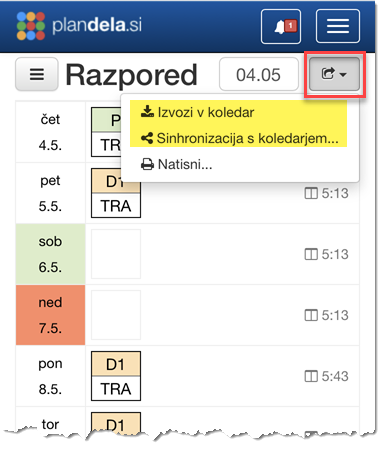
Manual export
you can download the .ics file in the Plan tab by clicking on
and selecting Export to calendar. Alternatively, you can use the one
attached to the mail you receive when plan in published or changed.
You can then open the file in your calendar app. The calendar will be populated with the shifts and absences in the interval following the file creation time up-to the last day of the published plan.
Automatic synchronisation
To set up automatic synchronisation, you need to input appropriate URL link into your calendar app settings. URL link is obtained by clicking and selecting Sync with calendar… .
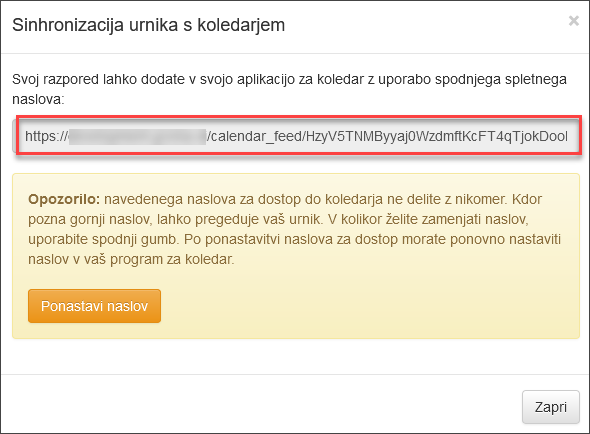
Calendar app settings for automatic synchronisation
Microsoft Outlook
- In Outlook 2007, select Tools --> Account Settings from the menu. In Outlook 2010/2013, select File(File) --> Info(Info) --> Account Settings from the menu.
- Click on the Internet Calendars tab and then on the New button.
- Paste the URL link (see image above) and click Add.
- In the Subscription Options window you can rename the calendar and set some other options.
- Finally, click OK and Close.
The new calendar will be refreshed after each Outlook restart.
Google calendar
- Open Google Calendar on your computer.
- On the left-hand side, next to the “Other calendars” section, click the Add from URL icon.
- Enter the URL link of the calendar in the provided field (see image above).
- Click Add calendar. The calendar will be displayed on the left-hand side in the “Other calendars” section.
You will need to wait up to 12 hours for the changes to appear in your Google Calendar.
iPhone / iPad
- Open Settings --> Mail, Contacts, Calendars --> Add Account….
- From the list of providers (iCloud, Exchange, Gmail, etc.), select Other.
- In the displayed window, click Add Subscribed Calendar.
- Enter the URL link of the calendar in the provided input field (see image above) and click Next.
- In the displayed window, keep the default values and click Save.
Print plan
You can print the shift plan in the Plan tab by clicking on and selecting Print….
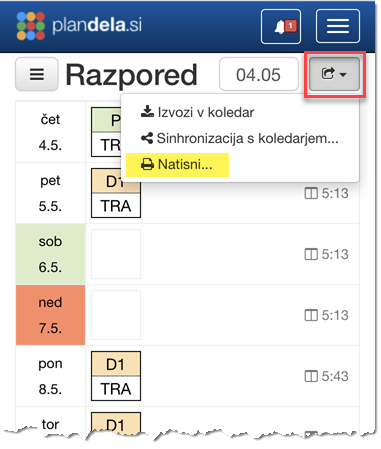
In the window that appears, you can select the interval of the shift plan and optionally whether the legend should be printed alongside it.
The shift plan preview opens in a new browser tab and is in pdf format.
Team Plan
If you have no permission to view the plan of your colleagues, the page will not be displayed.
In Team plan you can view the work plan for colleagues for whom you are authorized so.
You can access the team plan by clicking the Team plan link in the Main Menu.
You can browse the timetable by scrolling horizontally (by dates) and vertically (by employees). Use the date picker to jump to any date. You can adjust the size of the cells in the timetable by using the pinch gesture (on mobile devices), or by selecting zoom level in the menu.
You can filter the rows displayed by entering a team or employee in the field .
Clicking on an employee’s name will display their shared details (email, phone).
View by shifts
If configured, you can access the views by different combinations of shifts and absences by clicking on the and selecting it.
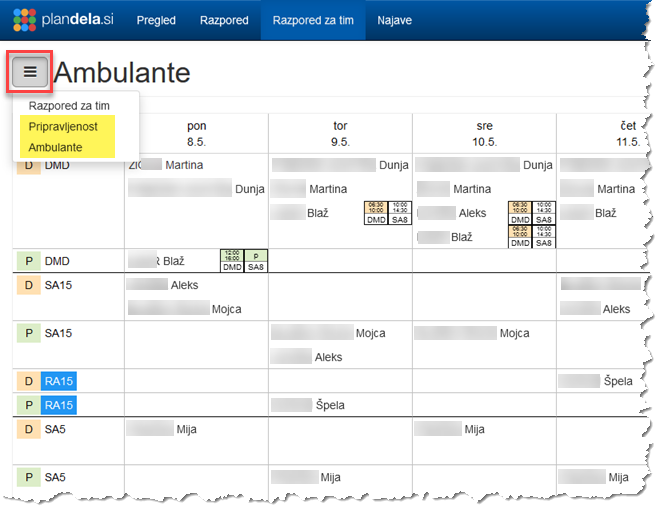
Reports
If reports are not enabled in your organisation, the page is not displayed
Using reports, you can view the summarized work related data, such as your worked hours for specific periods, your annual leave status, your attendance, etc.
On the Reports page you will find a list of reports available. It shows the type of report, the data period and who published the report.
You can view more detailed content by selecting a report from the list. The totals or values by item (hours worked, number of commutes, etc.) for the period of the report or your arrivals and departures by day are displayed, together with the duration of your attendance.
Notifications
Notifications keep you up-to-date with important changes to your working plan, requests and other work related information. You can access notifications by selecting Notifications (bell icon) in the Main Menu.
If you have pending notifications, a number of new unread notifications is shown as a number in the red square on the bell in the Main Menu.
Pending notifications can be listed by clicking Notifications (bell icon). To see all notifications, click All notifications.
Clicking a notification triggers the action assigned to it, e.g. displaying a newly published work plan, request, report, etc.

